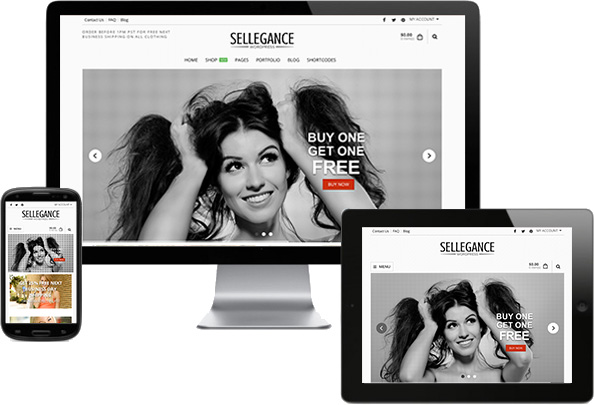
Sellegance
Version 1.1.0.4 06/11/2019
This document covers the installation and use of this theme and often reveals answers to common problems and issues - I encourage you to read this document thoroughly if you are experiencing any difficulties.
If you have any questions that are beyond the scope of this document, feel free to send me a message using my contact form here
Setup → Installation
Theme Requirements
In order to proceed with the theme installation, you need to make sure you have the latest version of WordPress (v4.5+) on your self-hosted site. The theme has been built to work with the latest version of WooCommerce (v3.0+).
Install Theme
To install this theme you must have a working version of WordPress already installed. For information on installing the WordPress platform, please see the WordPress Codex. Upon downloading the "package.zip" file from Themeforest, you'll have all files you need inside. Extract the "package.zip" file and inside you will find the theme zip file called "sellegance.zip", that is the file you need to install.
Please Note: You can install the theme in two ways: through Wordpress, or via FTP. If you have trouble installing the theme via Wordpress, please proceed with installing it via FTP and you will be able to get around the issue.
WordPress installation
The theme zip file is around 7mb and in some hosting providers, the default value for max_upload_limit left default which is 2mb.
To solve this problem you should either increase your maximum upload size (to 10mb) on your hosting admin panel or ask your host to do it for you if you do not have the privilege to alter your server php settings. This is a very common request and they should be able to help you out. Once the limit is increased you can re-try the install and you’ll be all good to go.
Follow the steps below to install via Wordpress.
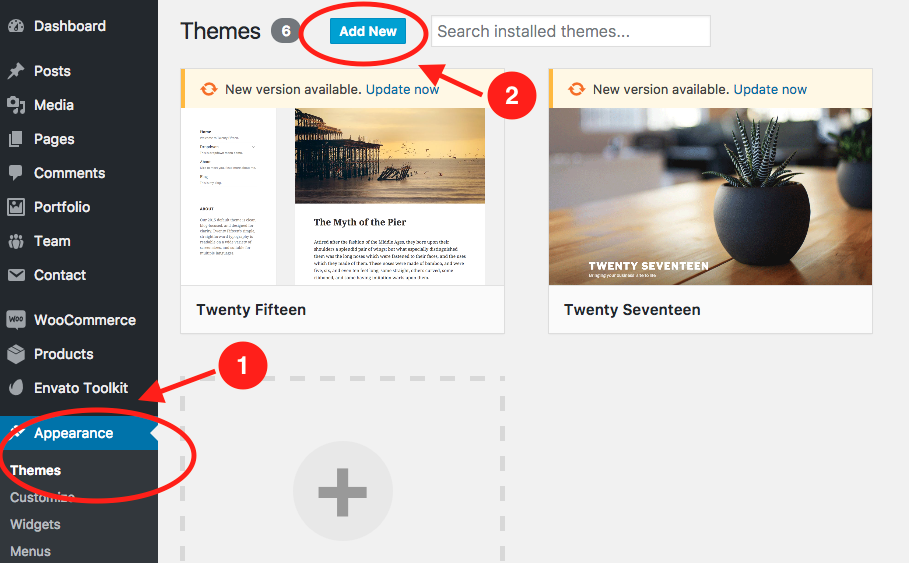
1 Navigate to Appearance > Themes and 2 click the Add New button.
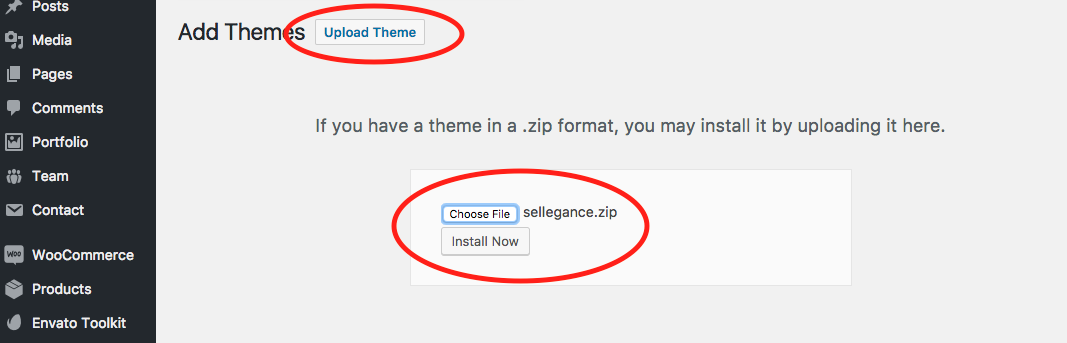
Click the Upload Theme button on the next page.

Navigate to find the "sellegance.zip" file on your computer and click Install Now button.
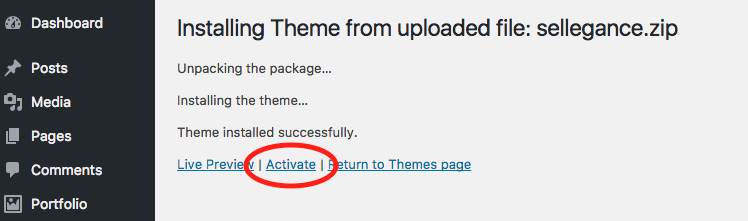
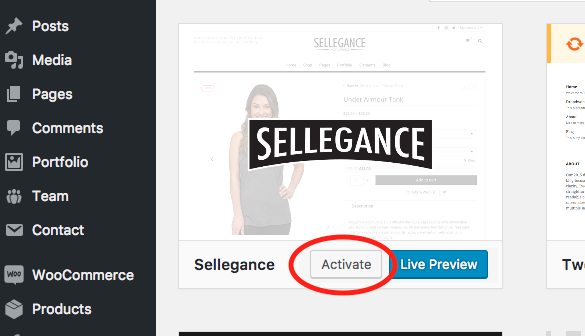
Once the file is uploaded and installed, click Activate.
FTP installation
Follow the steps below to install via FTP.
- Log into your hosting space via an FTP software
- Unzip the sellegance.zip file and ONLY use the extracted sellegance theme folder
- Upload the extracted sellegance theme folder into /wp-content/themes in your WordPress installation
- Go to Appearance > Themes and activate Sellegance theme.
Setup → Install plugins
Some plugins are required to enabled all the theme features.
This theme includes some plugins.
- Revolution Slider - Premium responsive slider.
- Visual Composer - A graphical interface to manage your page layouts and elements.
- Sellegance Theme - Portfolio - A plugin to add porftolio pages to your site.
- WooCommerce - WordPress eCommerce plugin. This plugin is not bundled but it's necessary to use all theme eCommerce features.
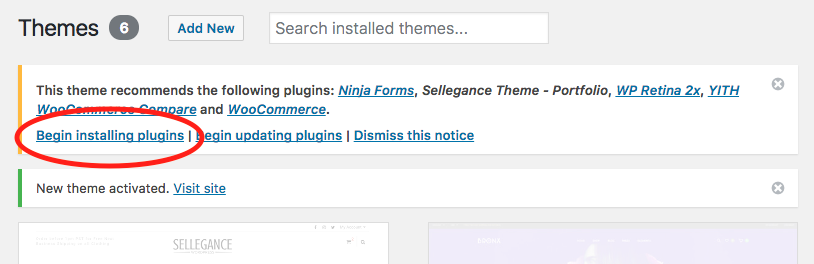
In the notification message on the top of the admin page, click the Begin Installing Plugins link
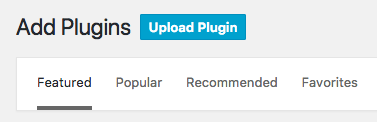
... or go to Appearance > Install Plugins.
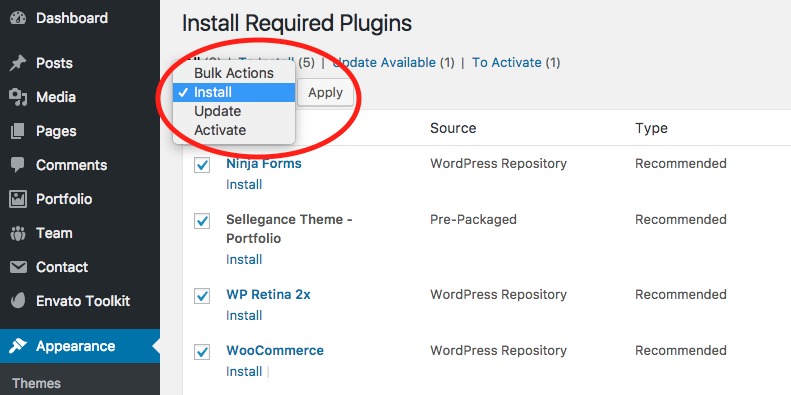
Select all the plugins in the list and choose Install from the dropdown menu, then click Apply.
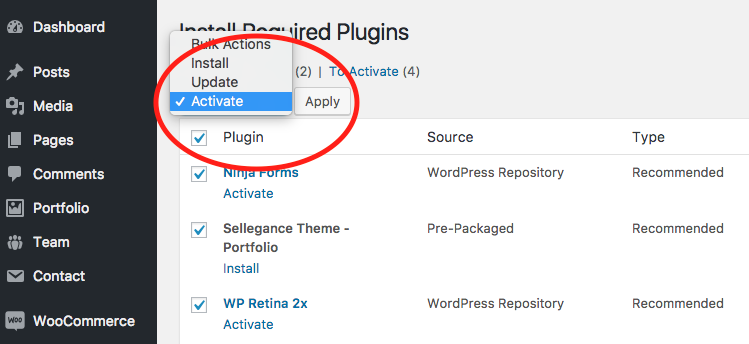
After all the plugins have been installed, click the Return to Required Plugins Installer link.

Again, select all the plugins in the list and choose Activate from the dropdown menu, then click Apply.
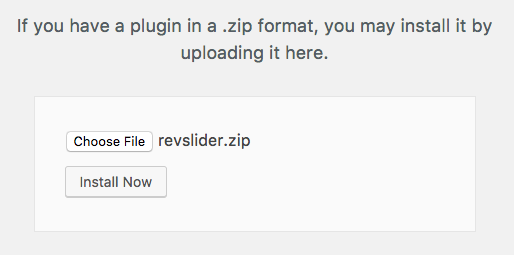
Install Revolution Slider
Revolution Slider plugin is in a separate folder. It's not included in the installable theme file because it would make the zip file too big.
Go to Plugins > Add New. On the top left choose Upload Plugin
On the theme package folder Plugins select the file revslider.zip and install
Setup WooCommerce
WooCommerce will now display a notification message on top of the WordPress admin. Click the Install WooCommerce Pages button to complete the installation.

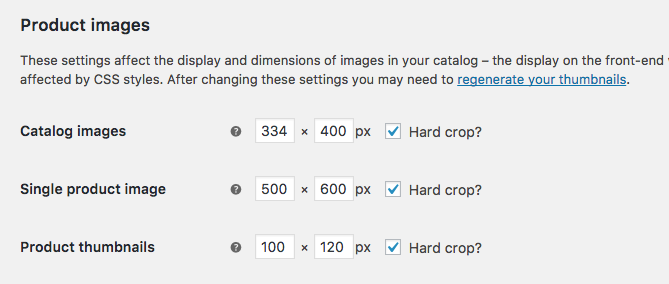
Change image sizes
This theme uses image sizes other than WooCommerce normal sizes. Go to WooCommerce > Settings > Products | Display and change sizes to these:
Regenerate Thumbnails
After image sizes are set, you'll need to resize all images. You can do it automatically with the plugin Regenerate Thumbnails which is included in the plugins list to install.
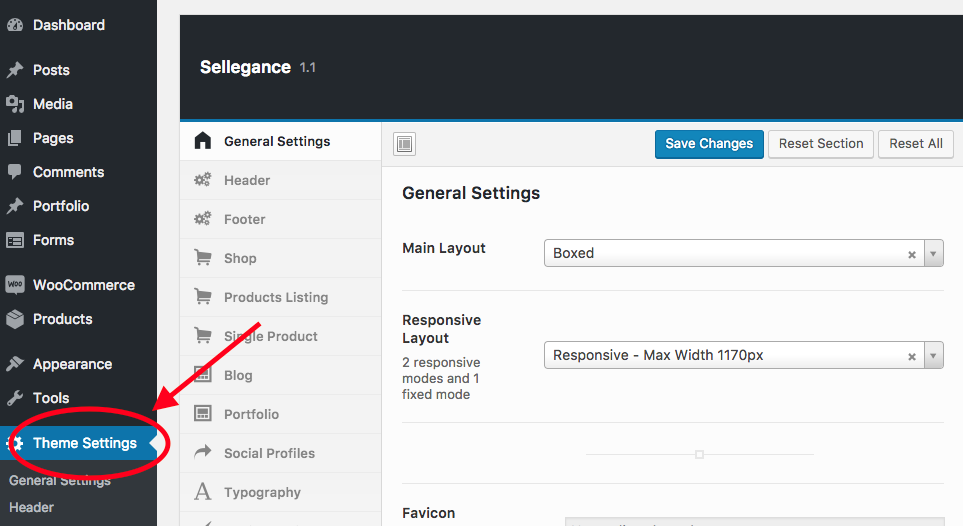
Setup → Theme Settings
After installing the theme, a new menu item Theme Settings will appear in the sidebar menu. Here you have access to all the theme's configuration settings. Each optinon is commented to be easy to understand and use.
More details about those settings will be explained in other sections of this documentation.
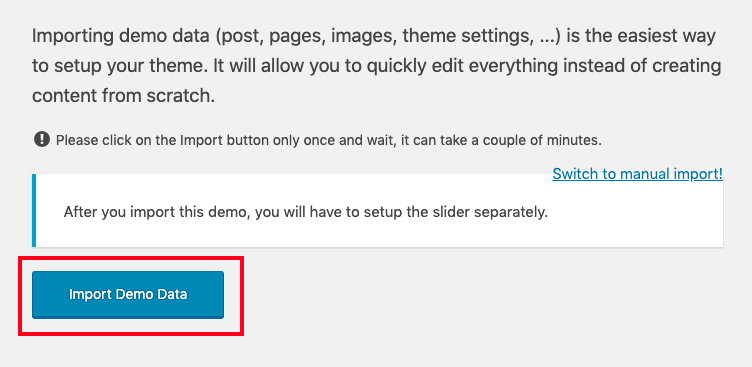
Setup → Sample Content
After activating the theme you can import the sample data. Go to Appearance > Import Demo Data
Click the Import Demo Data button only once and wait. It could take some minutes.
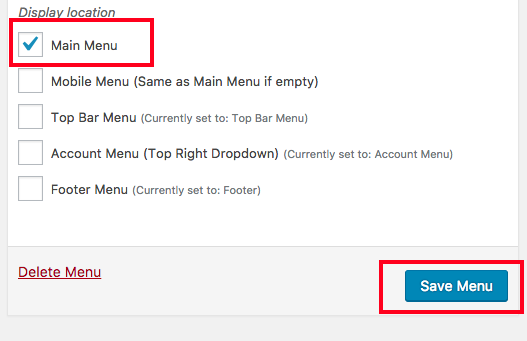
Setup → Sample / Menus
Menus should be imported and assigned to their positions. But you can change then at Appearance > Menus
Select each menu. For Example Main Menu
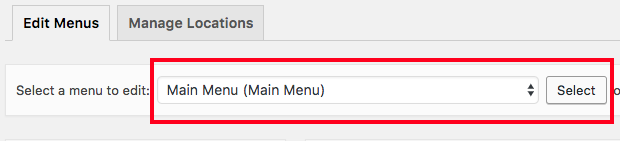
And match each menu with a location and save. Do it for all sample menus.
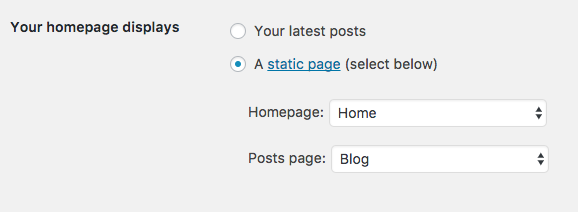
Setup → Sample / Homepage
You can also change the home page in Settings > Reading. The default configuration is:
Setup → Sample / Slider
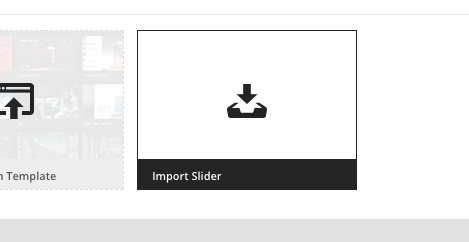
Import Sample Slider
The main slider won't be imported with the automatic script. You need to import it manually.
To start with some examples just import the sample sliders. Go to the main section of Revolution Slider and import the revslider_import.zip package
Confirm if you want to Overwrite (if you already have a slider) or you want to add the sample along with other sliders

Display slider on homepage
To place the slider Go to Appearance > Widgets and drag the Revolution Slider widget to the Revolution Slider position as shown here.
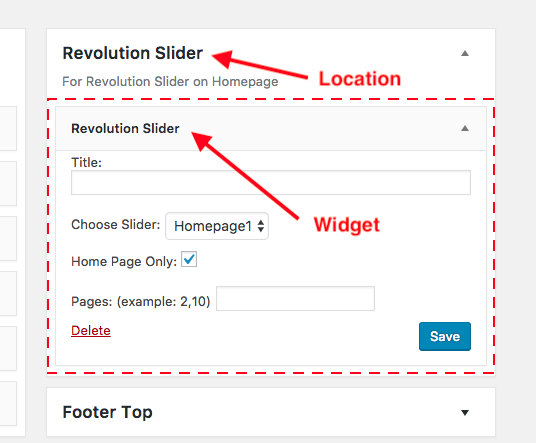
Save settings and refresh your homepage.
Updates
Theme
To udpate the template just reupload the theme files to wp-content/theme/sellegance/ folder.
To update from v1.0.4.5 to 1.1:
- Delete or rename your current wp-content/themes/sellegance folder.
- Upload the new template files
- Go to Sellegance Options and save your settings. There are new options.
IMPORTANT!
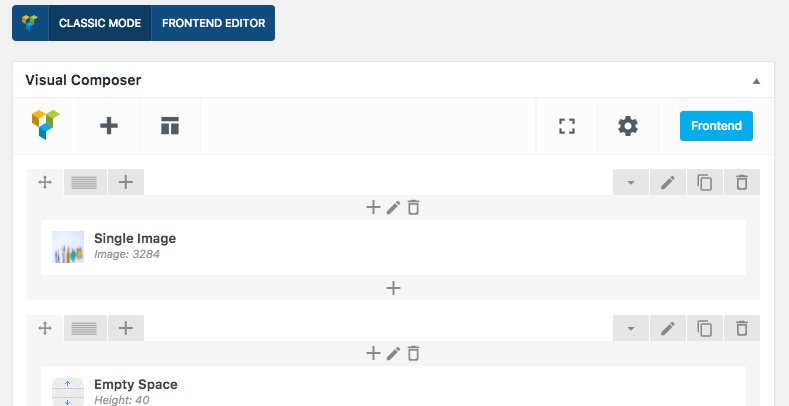
Sellegance v1.1 adds Visual Composer plugin to manage your pages. The previous shortcode system was removed.
If you are using the old shortcodes you need to manually create those sections again using the new Visual Composer tool available on the text editor.
Bundled Plugins
Revolution Slider is constantly updated too. To update the plugin just upload and unzip the file Plugin Updates/revslider.zip to your server folder wp-content/plugins/.
Contact me if you have any questions here
Layout → General
Go to Theme Settings > General Settings and choose the Main Layout
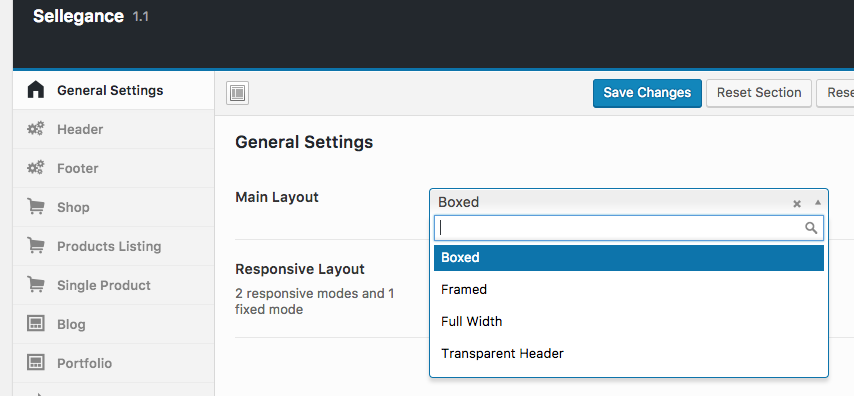
There are 4 options: Boxed (default), Framed, Full Width and Transparent Header.
Header
Layout → Menus
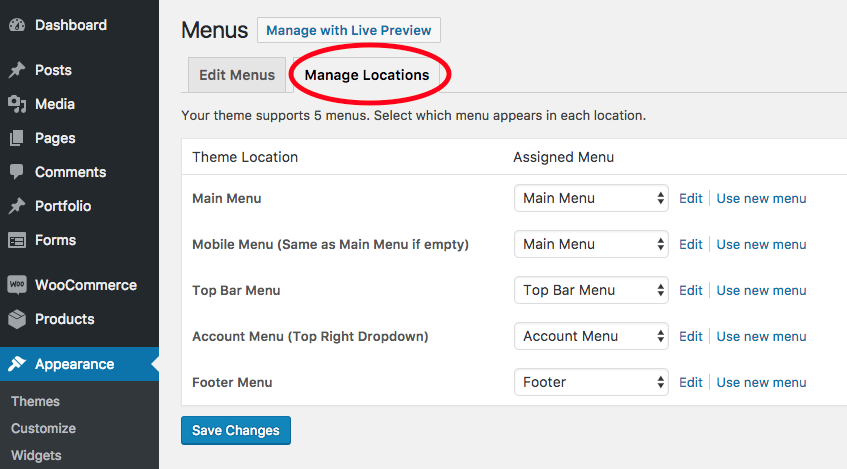
This theme has 5 menu locations:
Main Menu
This is main navigation thats located in the header
Mobile Menu
For mobiles. But it will be the same as the Main Menu if left empty.
Top Bar Menu
This is located at the top bar aligned to the left. This menu does not support dropdown
Account Navigation
It's a dropdown menu located at the top bar aligned to the right.
Footer Menu
A simple menu list at the page footer.
Creating Menus
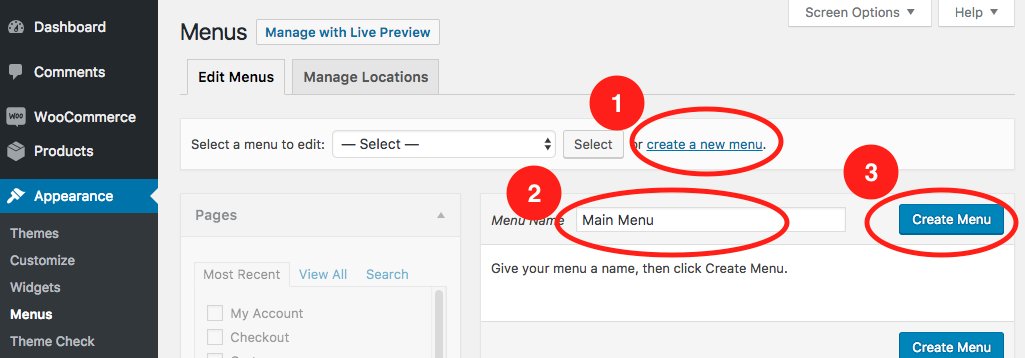
- Click the create a new menu link.
- Enter a name for the menu (this can be anything e.g "Main Menu").
- Click the Create Menu button.
Menu Locations
After creating your menu, you need to assign it to one of the theme's menu locations.
Click the Manage Locations tab and assign the menu(s) to their appropriate locations.
Dropdows (megamenu)
To add a multicolum menu
- 1. Check the Mega Menu Box and set the number of columns on the parent menu.
- 2. Choose the submenu layout: new row, full width row and HTML.
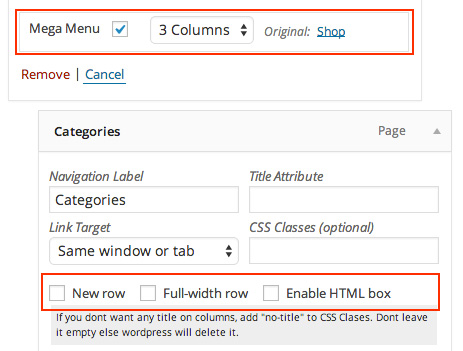
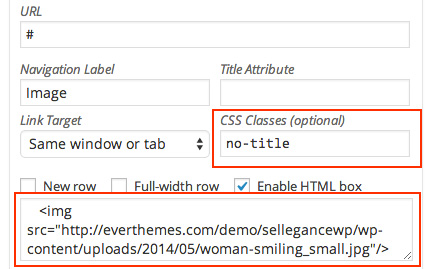
Column Image
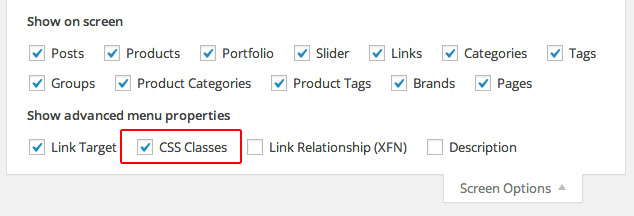
Enable these checkboxes to view the fields for CSS classes and Description:
To add an images to the menu:
- 1. Add CSS class
no-title - 2. Enter image url in the HTML box.
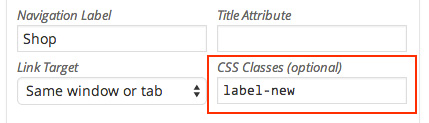
Add custom labels
Add these CSS classes to your menu setting to get labels:
Avaible classes: label-new, label-sale, label-popular, label-hot
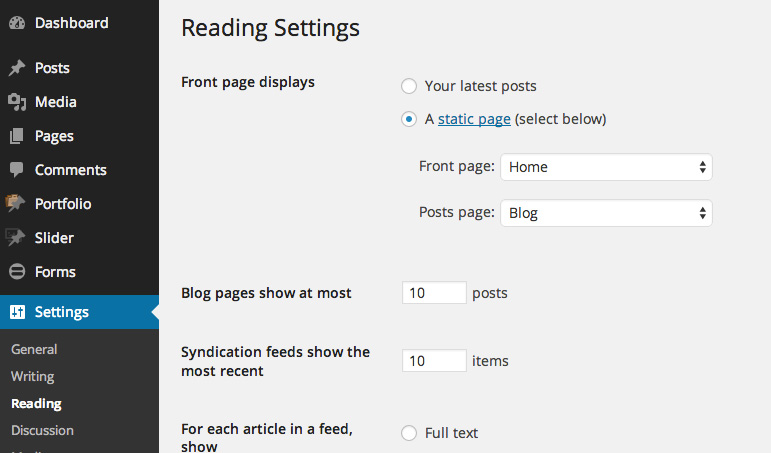
Layout → Homepage / Blog
- 1. Go to Settings > Reading
- 2. Select A static page
- 3. For Front page select the page you want to show as home. If you didn't import the sample content you will have to create a new page.
- 4. For Post page select a page called Blog. This could be any blank page. WordPress will render it as a blog.
If you want to use a full screen width slider use Homepage - Full screen slider template for Home page. See the next section Layout → Page Templates.
Layout → Page Templates
Page Templates
Here is a list of pages templates that are included in this theme:
- Default template
Default content with centered title. - Homepage FullScreen slider
Use this if you want to have sliders or content that goes all the way to screen edges - 100% width
Page without sidebars - Page with sidebar
Left or right sidebar - Portfolio - filter
Filterable portfolio

Porftolio
Firts install the plugin Sellegance Theme - Portfolio
Go to Dashboard > Portfolio > Add New. Give your Portfolio Title, Fill up the Details, Assign Featured Image, Assign Groups and save.
The Details section is self-explanatory. So you won't be facing any problems setting them up.
Sorting Portfolio Items
You can sort your Portfolio Items by navigating to Portfolio > Sort Portfolio and Drag-and-Drop them in the Order you want them to get displayed on the Portfolio Items Page.
Portfolio Items Page
Assigning a Portfolio Items Page is extremely easy. All you have to do is to Create a New Page and Portfolio - Filter from the "Page Attributes" box.
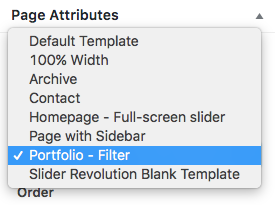
After assigning the desired Portfolio Template, you will have to "Publish" the page in order to see the Template Specific Options which can be setup according to your Needs.
Revolution Slider
Theme supports Revolution Slider, you will see the slider on the list of available plugins to install.
Once you install the plugin you will be able to create and use the slider following the documentation provided by the plugin developers which is included in the folder Documentation / Revolution Slider.
Check the Revolution Slider full documentation included in in the folder Documentation / Revolution Slider
To setup Revolution Slider follow the next steps:
Create new slider
Navigate to Slider Revolution > Create New Slider.
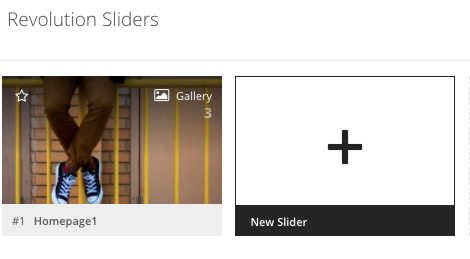
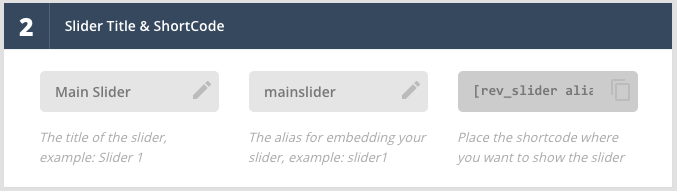
After that you will reach a form where you are prompted to enter the Sliders Basic Settings, a Slider Title and a Slider Alias.
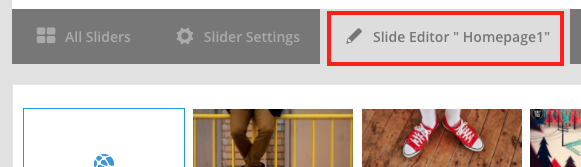
Then, go to Slide Edito and start customizing your slides
Set up Dark or Light slides with Transparent Header layout.
If you choose the Transparent Header layout, the slider will be behind the header elements (logo, navigation, icons, etc.
Change the text color for each of your slides image background using custom parameters. Go to Slide Info

Use slide-dark if you want this style:
Or slide-light for this style:
Add Revolution Slider widget
To place the slider Go to Appearance > Widgets and drag the Revolution Slider widget to the Revolution Slider position as shown here.
Choose the slider (Homepage1 in the example) and save.
Widgets
Widget areas
- Revolution Slider
Use this to insert a full screen Revolution Slider. Also, select the Homepage-Full Screen Slider page template. - Sidebar
The default sidebar visible on Blog and Pages with sidebar template - Shop Sidebar
Sidebar for shop category pages. - Footer Top
Top footer. Only visible if widget is added. Add a widget to create a column. 4 widgets = 4 columns. - Footer Bottom
Bottom footer. Only visible if widget is added. Add a widget to create a column. 4 widgets = 4 columns.
Custom Widgets
The theme comes with 4 custom widgets:
- Sellegance/Social Icons
A widget that displays customized social icons. - Sellegance/Recent Portfolio
Displays your recent portfolio’s posts. - Sellegance/Blog Posts lists
Displays your recent/popular/rundom blog posts. - Sellegance/Brands
Displays shop brands (with or without logos).
Translation
1. Download and install а gettext file editor, like Poedit on your computer. To download Poedit go to http://poedit.net/download.php.
2. Download a copy of your theme's .pot file to your computer using your FTP program of choice. This file is usually located inside the "languages" folder: /yoursite.com/wp-content/themes/sellegance/languages
3. Open Poedit and choose Create new translation.
4. Choosing the language of the translation, Poedit will automatically create a .po file and will name it with the appropriate language code. You can find all language and country codes here.
5. To translate the strings in your language just click on a text row and translate each line as required. When you've translated all the necessary text, click on the Save button to save or overwrite the previous .po file on your computer.
Click on Save button again to generate a .mo file which is the one that WordPress will use to translate your theme.
You can set your Poedit to always compile a .mo file when saving changes from Poedit > Preferences, on the Editor tab check the Automatically compile .mo file on save box
6. The name of the .mo file is very important. It’s also case sensitive. If it doesn’t match the theme name, language code, and country code it won’t work. Same goes for the define constant in step 2 above.
File naming format should be as follows:
[THEME NAME]-[LANGUAGE CODE]_[COUNTRY CODE].mo
Example: sellegance-de_DE.mo
7. Upload the newly translated .po and .mo files in the directory: /yoursite.com/wp-content/languages/themes/sellegance-de_DE.mo
Please note, that if you don't have such a folder in your wp-content directory, you have to create one, following the steps below:
- Create a new folder called “languages”
- Go inside that folder and create another folder called “themes”
- Copy the sellegance-de_DE.mo file you set aside earlier into this folder
Please note that you don't have to delete the .pot file. If you want to translate the theme in other language you will need it.
The .po file is your editable file which you can always load back up in poedit and update. If you edit the .po file, you have to generate a new .mo file. Also replace old .po and .mo files with the new ones in your language folder.
Support
If you have any questions beyond the scope of this file, feel free to send me an email using my contact form at Themeforest. I'd be glad to help you :)
Also, you could join facebook page and twitter profile to keep up to date with the latest improvements of Sellegance theme.
Changelog
Release: 05/11/2019
- Updated - WP Bakery Page Builder 6.0.3
- Removed wc_print_notices from all pages. It's not necessary on recen WooCommerce versions because it's hooked.
Release: 05/05/2019
- Updated - Revslider 5.4.8.3 (PHP 7.3+ fixes)
- Fixed - Deprecated functions in PHP 7.3+
Release: 05/01/2019
- Updated - WooCommerce files to v. 3.6.0
- Fixed - Variation images not changing
- Fixed - Small CSS issues
Release: 01/26/2018
- Updated - WooCommerce files to v. 3.5.1
- Fixed - Small CSS issues
Release: 01/26/2018
- Fixed - Bug with WooCommerce shortcodes.
Release: 01/23/2018
- Added WP Bakery - Visual Composer
- Updated Revolution Slider 5.4.5.1
- Compatibility with WordPress 4.9.2
- Compatibility with WooCommerce 3.2.6
- Updated FontAwesome
- CSS updates.
Release: 11/03/2016
- Compatibility with WooCommerce 2.5.5
- Updated FontAwesome
- Redux Framework bundled as plugin
- CSS updates.
Release: 08/10/2015
- Updated Revolution Slider.
- Compatibility with WooCommerce 2.4.1
- CSS updates.
Release: 06/25/2015
- Fixed Vulnerability in prettyPhoto jQuery library
- Updated bundled plugins.
- Compatibility with WooCommerce 2.3.11
- Fixed issue with Yith Ajax Search 1.3.2
- CSS updates.
Release: 04/28/2015
- Fixed Vulnerability with
add_query_arg()andremove_query_arg() - Updated Redux Framework and other included plugins.
- Compatibility with WooCommerce 2.3.8
- Pinterest icon won't be changed if a official widget is embedded.
- Updated ajax search form
- Single images will also open in a popup when linked to media file.
- Small CSS fixes.
Release: 02/13/2015
- Fixed a problem with the Minicart on hover.
Release: 02/12/2015
- Added compatibility with WooCommerce 2.3.x
Release: 12/08/2014
- Added global search with WooCommerce active
- Added ajax search plugin
- Added thumbnails galleries on portolios
- Updated compatibility with WordPress 4.0.1
- Updated compatibility with WooCommerce 2.2.8
- Updated Revolution Slider
- Fixed small CSS issues
Release: 09/13/2014
- Added sidebar on product page
- Added Brands images to frontend
- Added filter by category on latest post shortcode
- Updated compatibility with WordPress 4.0
- Updated compatibility with WooCommerce 2.2.2
- Updated Revolution Slider
- Fixed missing icons on header
Release: 06/23/2014
- Fixed issue with image resize function. It was causing errors on portfolio page.
- Fixed tracking code field on theme options. It was rendering the script as text.
Release: 05/29/2014
- First Release