Sellegance
Version 1.0.4.3 06/25/2015
See the latest docs online here
This document covers the installation and use of this theme and often reveals answers to common problems and issues - I encourage you to read this document thoroughly if you are experiencing any difficulties.
If you have any questions that are beyond the scope of this document, feel free to send me a message using my contact form here

Update
To update from v1.0.2 to 1.0.3:
- Delete or rename your current wp-content/themes/sellegance folder.
- Upload the new template files
- Go to Sellegance Options and save your settings. There are new options.
Notes:
- There's a new static mode for the recent posts shortcode. Please, update the shortcode and choose slider or static.
- It's recommended to install YITH WooCommerce Ajax Search. The plugin is already included in the package.
Contact me if you have any questions here
1. Installation
Theme Requirements
In order to proceed with the theme installation, you need to make sure you have the latest version of WordPress (3.5+) on your self-hosted site. The theme has been built to work with the latest version of WooCommerce (2.0+) as well as with older versions (1.6+).
1.1 Install Theme
To install this theme you must have a working version of WordPress already installed. For information on installing the WordPress platform, please see the WordPress Codex. Upon downloading the "package.zip" file from Themeforest, you'll have all files you need inside. Extract the "package.zip" file and inside you will find the theme zip file called "sellegance.zip", that is the file you need to install.
Please Note: You can install the theme in two ways: through Wordpress, or via FTP. If you have trouble installing the theme via Wordpress, please proceed with installing it via FTP and you will be able to get around the issue.
Follow the steps below to install via FTP.
- Log into your hosting space via an FTP software
- Unzip the sellegance.zip file and ONLY use the extracted sellegance theme folder
- Upload the extracted sellegance theme folder into wp-content > themes in your wordpress installation
- Activate the newly installed theme. Go to Appearance > Themes and activate the installed theme.
Follow the steps below to install via Wordpress.
- Navigate to Appearance > Themes.
- Click Install Themes and hit the upload button.
- Navigate to find the "sellegance.zip" file on your computer and click "Install Now" button.
- The theme will be uploaded and installed.
- Activate the newly installed theme. Go to Appearance > Themes and activate the installed theme.
We have include the exported XML file from our demo, this allows you to quickly set up your theme the same way our demo is set up. Please note, the XML file does not include images or the slider data. See the slider sections of this documenation to set up the sliders.
Follow These Steps Below To Import The XML File
- The XML file is included within the download package at root level in a folder called Demo Data
- Navigate to WP Admin > Tools > Import
- Select and install WordPress importer
- Once its installed, select the XML file and upload it. It will take a few minutes to install and upload all content
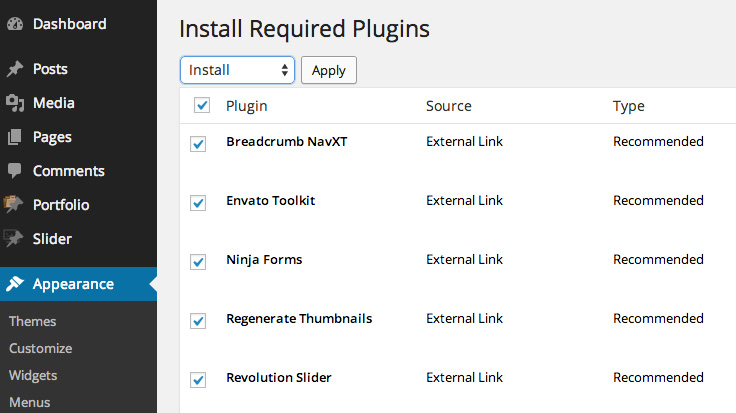
1.2 Install plugins
This theme comes bundled with many plugins.
- WooCommerce - WordPress eCommerce plugin
- WooCommerce Multilingual - Allows running fully multilingual e-Commerce sites with WooCommerce and WPML.
- WooSidebars - Create unlimted sidebars for pages and footers.
- Search By SKU - for Woocommerce - The search functionality in woocommerce doesn't search by sku by default.
- Revolution Slider - Revolution Slider - Premium responsive slider – $15 Value
- Ninja Forms - Just another contact form plugin. Simple but flexible.
- Regenerate Thumbnails - Use to resize product images to recommended sizes.
- WP Retina 2x - Your website will look beautiful and smooth on Retina displays.
- Breadcrumb NavXT - Adds a breadcrumb navigation showing the visitor's path to their current location.
First, go to Appearance > Install Plugins
Supported plugins
- YITH WooCommerce Wishlist - allows you to add Wishlist functionality to your e-commerce.
- YITH Woocommerce Compare - YITH Woocommerce Compare allows you to compare more products with woocommerce plugin, through product attributes.
- YITH WooCommerce Zoom Magnifier - YITH WooCommerce Zoom Magnifier is a WordPress plugins that enables you to add a zoom effect to product images.
- WooCommerce Currency Converter - It uses Open Exchange Rates for converting your product prices to a currency of your customers choice!
1.3 Setup WooCommerce
Install WooCommerce
Once you install and activate WooCoomerce you'll see this notice:

Complete the installation and go to Pages > All Pages
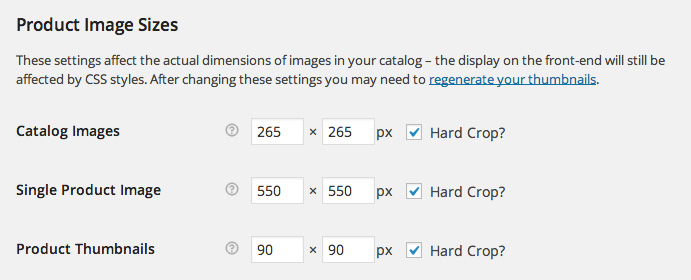
Change image sizes
This theme uses image sizes other than WooCommerce normal sizes. Go to WooCommerce > Settings > Catalog and change sizes to these:
Regenerate Thumbnails
After image sizes are set, you'll need to resize all images. We can do this automaticly with the plugin: "Regenerate Thumbnails".
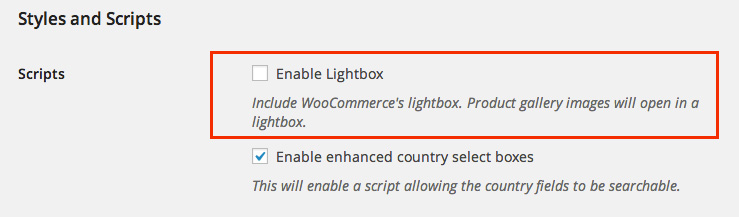
Remove default WooCommerce Lightbox
Go to WooCommerce > Settings > General and uncheck "Enable Lightbox". This theme has built in lightbox.
1.4 Install demo content (Optional)
The theme comes with a .xml file containing demo content you can import into your WordPress site. This will help you get started, in case you are running on a fresh WordPress installation with no content at all.
- 1. Go to Tools > Import
- 2. Click WordPress to install the WordPress importer.
- 3. On Import Wordpress screen click choose file and select the file /themefolder/Dummy data/flatsome_demo_content.xml
- 4. Click Upload file and import and wait for it to import
2. Pages
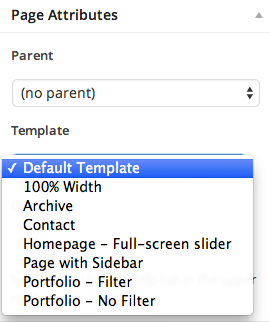
2.1 Page Templates
Here is a list of pages templates that are included in this theme:
- Default template
Default content with centered title. - Homepage fullscreen slider
Use this if you want to have sliders or content that goes all the way to screen edges - 100% width
Page without sidebars - Page with sidebar
Left or right sidebar - Portfolio filter
Filterable portfolio - Portfolio no filter
Paged portfolio - Contact
Set up a contact form with address and map
2.2 Homepage/Blog setup
- 1. Go to Settings > Reading
- 2. Select "A static page"
- 3. For Front page select the Homepage page you want in the select box. If no demo content is uploaded you will need to create a new page.
- 4. For Post page select a page called "Blog". This could be any blank page. WordPress will render it as a blog.
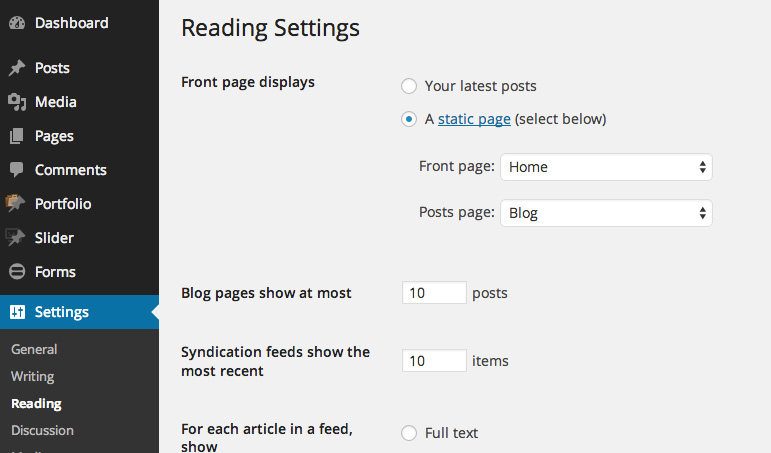
If you want to use a full screen width slider use "Homepage - Full screen slider" template for Home page.
2.3 Homepage Slideshow
2.4 Portfolio Items
Go to Dashboard -> Portfolio -> Add New. Give your Portfolio Title, Fill up the Details, Assign Featured Image, Assign Groups and save.
The Details Section is Self-Explanatory. So you wont be facing any problems Setting them up.
Sorting Portfolio Items
You can sort your Portfolio Items by navigating to Portfolio -> Sort Portfolio and Drag-n-Drop them in the Order you want them to get displayed on the Portfolio Items Page.
Portfolio Items Page
Assigning a Portfolio Items Page is extremely easy. All you have to do is to Create a New Page and Assign the Desired Portfolio Template from the "Page Attributes".
Choose one the options:
- Portfolio - Filter Creates Portfolio Items Page with isotope Filter
- Portfolio - No Filter Creates Paged Portfolio Items Page without isotope Filter with pagination
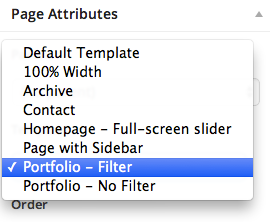
After assigning the desired Portfolio Template, you will have to "Publish" the page in order to see the Template Specific Options which can be setup according to your Needs.
3. Slider
3.1 Revolution Slider
Theme supports Revolution Slider, the installation of which would be provided for you after theme activation.
After that you may create the sliders and use them on the site according to the plugin documentation. We have included folder called "Revolution Slider" that contains the documentation from the authors of the slider. Please, refer to it for further information about slider settings. Slider can be added to any page.
To setup Revolution Slider follow the next steps:
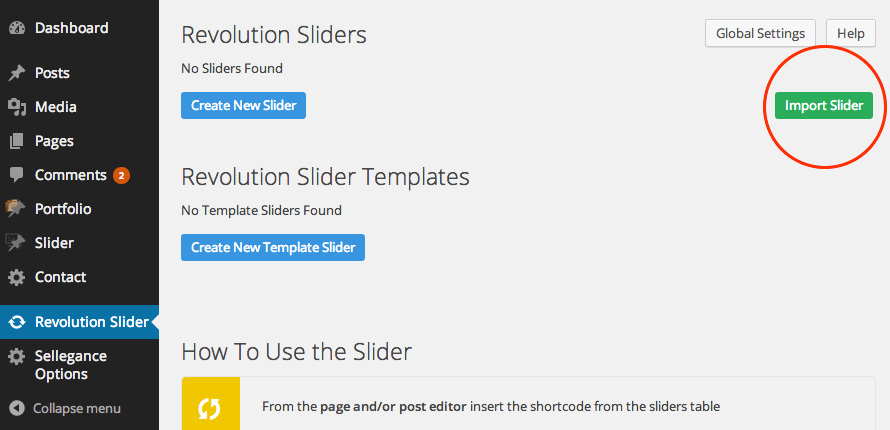
- Navigate to Revolution Slider -> Create New Slider.
- After that you will reach a form where you are prompted to enter the Sliders Basic Settings, a Slider Title and a Slider Alias.
- The next step is creating/editing slides. Insert the slider content.
- If you want, you may use our demo slides by importing the revslider_import.zip and full_width.zip archives, as it mentioned on the screenshot. Upload file and next push Import Slider button. You can find archives in Documentation folder of theme package.
3.2 iOS slider
There's another type of slideshow if you want something simple. Although not as powerful as Revolution Slider it will help you to add slide posts.
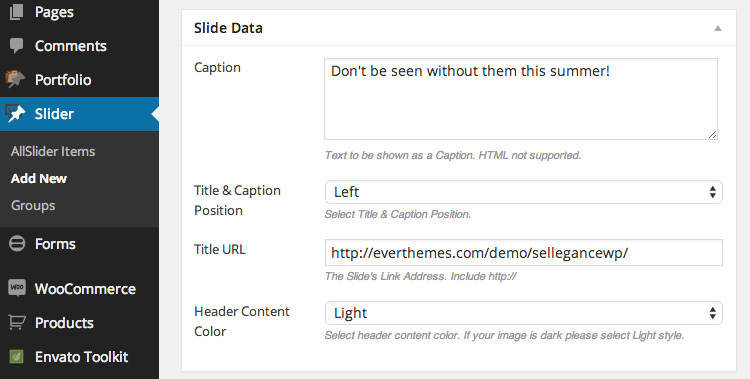
- Go to Slider section
- You can create Slider Groups (Optional)
- Click 'Add New Slide' and add your Slide Title, Featured Image, Title & Caption Position, Caption, Title URL, Header Content Color and click Publish.
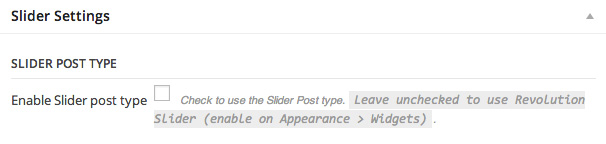
Then go to Pages and add/edit your Homepage. Select 'Homepage - Full-screen slider' and Save Page. After that you will see Slider Settings.
Enable the Slider post type. If you plan to use Revolution Slider leave unchecked instead.
4. Navigation
4.1 Menu Locations
This theme has 3 menu locations
Main Menu
This is main navigation thats located in the header
Top Bar Navigation
This is located at the top bar aligned to the left. This menu does not support dropdown
Right Header Navigation
This is located at the top bar aligned to the right. This menu does not support dropdown
4.2 Dropdows (megamenu)
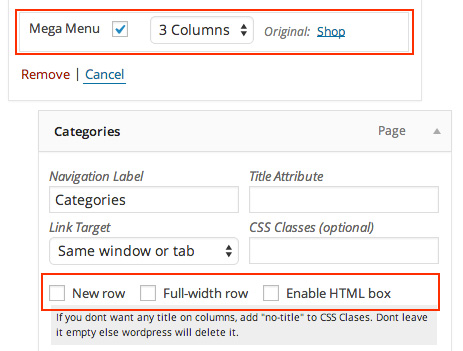
To add a multicolum menu
- 1. Check the Mega Menu Box and set the number of columns on the parent menu.
- 2. Choose the submenu layout: new row, full width row and HTML.
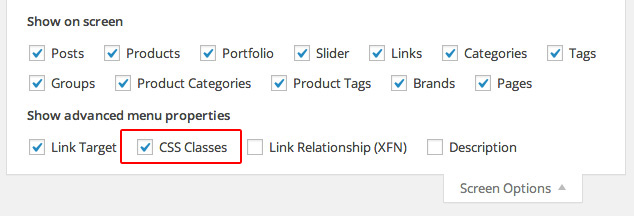
Cant see CSS Classes or Description?
You need to enable these checkboxes to view field for CSS classes and Description:
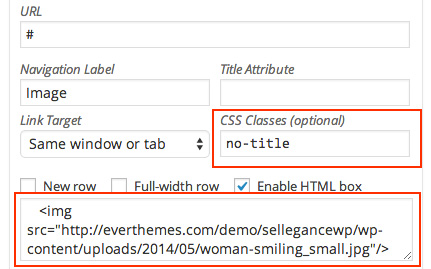
Column Image
To add an images to the menu:
- 1. Add CSS class
no-title - 2. Enter image url in the HTML box.
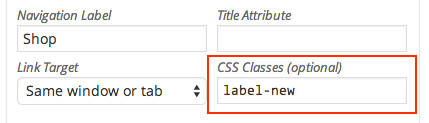
Add custom labels
Add these CSS classes to your menu setting to get labels:
Avaible classes: label-new, label-sale, label-popular, label-hot
5. Shortcodes
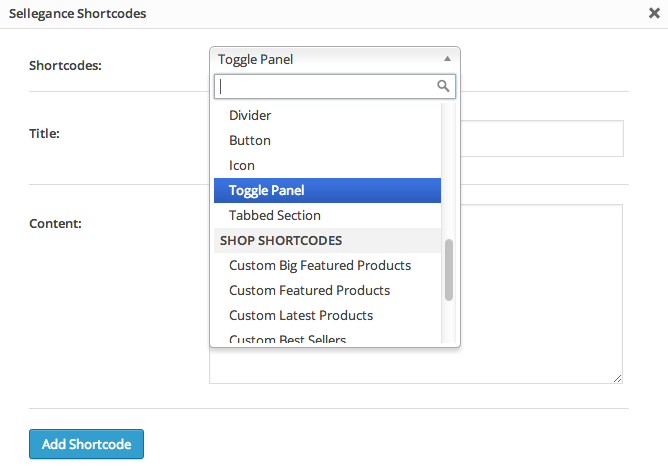
The theme comes pre-packed with a number of shortcodes allowing you to add styled content to your site with little effort.
The available shortcodes have been included in a one-click menu. When creating a page or post, click shorcodes button on the text editor to show a list of shortcodes.

Choose the desired option, fill in required fields and click Add Shortcode.
6. Widgets
6.1 Widget areas
- Revolution Slider
Use this to insert a full screen Revolution Slider. Also, select the Homepage-Full Screen Slider page template. - Sidebar
The default sidebar visible on Blog and Pages with sidebar template - Shop Sidebar
Sidebar for shop category pages. - Footer Top
Top footer. Only visible if widget is added. Add a widget to create a column. 4 widgets = 4 columns. - Footer Bottom
Bottom footer. Only visible if widget is added. Add a widget to create a column. 4 widgets = 4 columns.
6.2 Custom Widgets
The theme comes with 4 custom widgets:
- Sellegance/Social Icons
A widget that displays customized social icons. - Sellegance/Recent Portfolio
Displays your recent portfolio’s posts. - Sellegance/Blog Posts lists
Displays your recent/popular/rundom blog posts. - Sellegance/Brands
Displays shop brands (with or without logos).
7. Translation
1. Download and install а gettext file editor, like Poedit on your computer. To download Poedit go to http://poedit.net/download.php.
2. Download a copy of your theme's .pot file to your computer using your FTP program of choice. This file is usually located inside the "languages" folder: /yoursite.com/wp-content/themes/sellegance/languages
3. Open Poedit and choose Create new translation.
4. Choosing the language of the translation, Poedit will automatically create a .po file and will name it with the appropriate language code. You can find all language and country codes here.
5. To translate the strings in your language just click on a text row and translate each line as required. When you've translated all the necessary text, click on the Save button to save or overwrite the previous .po file on your computer.
Click on Save button again to generate a .mo file which is the one that WordPress will use to translate your theme.
You can set your Poedit to always compile a .mo file when saving changes from Poedit > Preferences, on the Editor tab check the Automatically compile .mo file on save box
6. The name of the .mo file is very important. It’s also case sensitive. If it doesn’t match the theme name, language code, and country code it won’t work. Same goes for the define constant in step 2 above.
File naming format should be as follows:
[THEME NAME]-[LANGUAGE CODE]_[COUNTRY CODE].mo
Example: sellegance-de_DE.mo
7. Upload the newly translated .po and .mo files in the directory: /yoursite.com/wp-content/languages/themes/sellegance-de_DE.mo
Please note, that if you don't have such a folder in your wp-content directory, you have to create one, following the steps below:
- Create a new folder called “languages”
- Go inside that folder and create another folder called “themes”
- Copy the sellegance-de_DE.mo file you set aside earlier into this folder
Please note that you don't have to delete the .pot file. If you want to translate the theme in other language you will need it.
The .po file is your editable file which you can always load back up in poedit and update. If you edit the .po file, you have to generate a new .mo file. Also replace old .po and .mo files with the new ones in your language folder.
Support
If you have any questions beyond the scope of this file, feel free to send me an email using my contact form at Themeforest. I'd be glad to help you :)
Also, you could join facebook page and twitter profile to keep up to date with the latest improvements of Sellegance theme.
Credits
- WordPress
- jQuery
- jQuery Easing Plugin (js/jquery.easing.1.3.js)
- Magnific Popup (js/jquery.magnific-popup.js)
- Slider Revolution (Premium) — A fully developed slide displaying system offering the capability to show images, videos and captions paired with simple, modern and fancy 3D transitions. Fully responsive and mobile optimized.
- iOS Slider (Premium) — Touch Enabled jQuery Horizontal Slider Plugin.
- Redux Framework — Redux is a back-end framework for creating and managing options.
- TGM-Plugin-Activation — It allows users to install plugins in singular or bulk fashion using native WordPress classes, functions and interfaces.
- html5shiv — The HTML5 Shiv enables use of HTML5 sectioning elements in legacy Internet Explorer and provides basic HTML5 styling for Internet Explorer 6-9, Safari 4.x (and iPhone 3.x), and Firefox 3.x..
- Respond.js — The goal of this script is to provide a fast and lightweight script to enable responsive web designs in browsers that don't support CSS3 Media Queries - in particular, Internet Explorer 8 and under.
- FITVIDS.JS - A lightweight, easy-to-use jQuery plugin for fluid width video embeds.
- Isotope - An exquisite jQuery plugin for magical layouts
- Modernizr - JavaScript library that detects HTML5 and CSS3 features in the user’s browser.
Changelog
Ver. 1.0.4.3
Release: 06/25/2015
- Fixed Vulnerability in prettyPhoto jQuery library
- Updated bundled plugins.
- Compatibility with WooCommerce 2.3.11
- Fixed issue with Yith Ajax Search 1.3.2
- CSS updates.
Ver. 1.0.4.2
Release: 04/28/2015
- Fixed Vulnerability with
add_query_arg()andremove_query_arg() - Updated Redux Framework and other included plugins.
- Compatibility with WooCommerce 2.3.8
- Pinterest icon won't be changed if a official widget is embedded.
- Updated ajax search form
- Single images will also open in a popup when linked to media file.
- Small CSS fixes.
Ver. 1.0.4.1
Release: 02/13/2015
- Fixed a problem with the Minicart on hover.
Ver. 1.0.4
Release: 02/12/2015
- Added compatibility with WooCommerce 2.3.x
Ver. 1.0.3
Release: 12/08/2014
- Added global search with WooCommerce active
- Added ajax search plugin
- Added thumbnails galleries on portolios
- Updated compatibility with WordPress 4.0.1
- Updated compatibility with WooCommerce 2.2.8
- Updated Revolution Slider
- Fixed small CSS issues
Ver. 1.0.2
Release: 09/13/2014
- Added sidebar on product page
- Added Brands images to frontend
- Added filter by category on latest post shortcode
- Updated compatibility with WordPress 4.0
- Updated compatibility with WooCommerce 2.2.2
- Updated Revolution Slider
- Fixed missing icons on header
Ver. 1.0.1
Release: 06/23/2014
- Fixed issue with image resize function. It was causing errors on portfolio page.
- Fixed tracking code field on theme options. It was rendering the script as text.
Ver. 1.0.0
Release: 05/29/2014
- First Release